Can I just say, that I have got the best party helper ever! Ryan rolled out all my airheads so I could use them on our awesome birthday cake: He also did all the cooking for our kid approved lunch. Such a trooper - not a party pooper - I commend him for his party hosting skills.
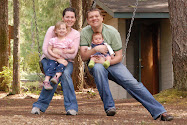
We are so thankful to have great friends and family who love us. Thanks for celebrating with us:
You know a day goes well when this is at the end:
Saturday, February 27, 2010
Good Family Good Friends
Friday, February 26, 2010
It's Smelling Sweet In Here.

My little fairy Madeleine, we all love you. HAPPY Birthday!
Maddie's morning started with her present so she can play all day long with it...fueled by donuts.
We found this for her on craigslist and are SO glad to have a willing Grandma to do the pickups for us and a willing Grandpa that whips out wood creations.


Friday, February 19, 2010
Makes Me Smile
These things make me smile:
February Sunshine
Homemade Anything
Baby Teeth
Giggles
My Forsythia Blooming
Swinging
Playhouses
Rubber Boots
Chalk
Tulips
Thinking About the Garden
Planning Projects for the Hubby
Hardware Stores
Smell of Sawdust
Dreams (the daydream kind)
Marathons
80's clothes
Strawberry Shortcake
Friends Who Share
Fresh Air
Lavender Scented Flower Beds
My Stroller
Art
Re-purposing
De-cluttering
Thrift Stores
Planning Trips
Vacation Rentals
Breakfast Buffets
Date Night
Listening to Hubby Talk Sports
Disc Golf
Walks in the Forest
The Beach
Love Notes
Surprises on the Windshield
Snow
Pig Tails
Cozy TV Time
The Olympics
Holding Hubby's Hand
My Family
Sunday, February 14, 2010
Glub Glub

I took the girls on adventure the other week to a close-by state park next to the water. They had a blast throwing rocks and running around. We found a beautiful agate specimen that has started our "adventure jar" Annora's favorite thing was throwing handfuls of algae covered rocks into the water. We were all having a great time...thowing - kicking...oops...kicking with rain boots on? Nice loose rain boots? If you've ever seen a kid kick off their boots, then you can imagine what it might be like when they are kicking rocks into the water. Maddie wasn't aware that her boot would literally fly off her foot, and neither was I. But it did. 10 feet out. Glub, glub. My first reaction was to jump in after it. My second, more sane but not fully sane reaction, was to snap pictures of the incident. My third reaction (which thankfully came only seconds after the first 2 reactions) was to look for a long stick. God provided just the right one with a "hook" on the end. Didn't have to step on the slimy rocks, which was more of a concern for me than actually getting in the cold water. (Shhh...don't tell my girls, I don't let them know that I'm really a pansy). Had to carry Maddie back to the car on my shoulders, but all was well. You always wonder why in cartoons they catch rubber boots while fishing...well, now you know.

Monday, February 08, 2010
Valentine Tutorial

Valentine's Day has become family day here at the Smith home. And we love crafts, and with all the fun Valentine making ideas, I thought we needed a place to put all our love notes. So I made these quick and easy pocket chair covers. Made of felt with only minor sewing, this is a project anyone can do. The first one is the hardest because you'll be making it without a pattern. But it's forgiving (like love should be!) .
Supplies:
You'll need some felt yardage (You could use craft squares, it just won't sit on the corners of the chair, but hang from middle)
sewing machine (hot glue will work in a pinch)
Velcro
pinking shears (optional)
(All my photos are clickable - so click if you need more detail)
First Step: Take a quick measurement of your chair back - add about 12 inches - just use common sense, and know that more is better than not enough. My first one didn't fit because I didn't leave room for ease around the curved heart seam. Now cut a rectangle of felt at desired length. Mine are appx. 15 inches long, which makes for a nice heart shape. Second Step: Fold the rectangle around the chair as shown in picture and pin at top. Make sure to leave some space (an inch should do) on the sides so you can sew that curved seam to create the heart shape. Now once you've adjusted the top pins, pin in a curved pattern. To match the seam on the other side, you can take it off the chair, fold it in half, and pin accordingly.
 Third Step: Take it to the sewing machine and sew along pinned area. Note that you only need to make a small seam running from the top to about 2 inches down the side...if you sew past that, you'll not have a way to attach it to the chair.
F ourth Step: Now Go ahead and cut around the seams with pinking shears and make the heart shape. An easy way to do this to make sure it's symmetrical is to fold it in half matching seams.
This will leave you with a nice big heart and on the back side you'll have some "straps". AND more importantly...now you have your pattern. (Checking the fit on the chair at this point is suggested) Fifth Step: Cut a heart from contrasting felt for the pocket. You'll want it to be about 1 inch smaller than your other heart. I used my already sewn heart as a pattern, then I folded it in half and cut about an inch from around the edges. I laid it down and snipped till I liked it.
Sixth Step: Sew your contrasting heart to the base heart. Remember to leave an opening at the top to slip in your love notes. Also note that if you don't sew high enough on your heart, it will flop over. This is remedied by sewing to the highest point of the heart.
Seventh Step: Use self adhesive Velcro to attach the back straps to the big heart. I didn't have any, so I hot glued mine on. Now put it on your chair! (I know there are lots of kinds of chair backs, so this MAY not work for your chair...but should for most.)
Eighth Step: Now if you were smarter than me, you cut out all the smaller contrasting hearts at the same time since you had a pattern that wasn't sewn on :)...but if not, it's okay. You just need to now use your already made chair pocket as a pattern to cut out all the pieces for as many as you need, then sew them up accordingly.
Additionally, you can embroider names, initials, sew felt pretties, or, as in my case, use iron on appliques. If I had the time, I would have embroidered beautiful name motifs...and if I had had less time I would have sewn our names in felt, but since I had even LESS time...the iron on initials were just the perfect touch.
Happy <3 day.
"And His banner of me is Love" Song of Solomon 2:4
Subscribe to:
Posts (Atom)